 |
To access each device configuration you need to activate a device opening a video window and press the Video Device Configuration. |
|
|
To access each device configuration you need to activate a device opening a video window and press the Video Device Configuration. |
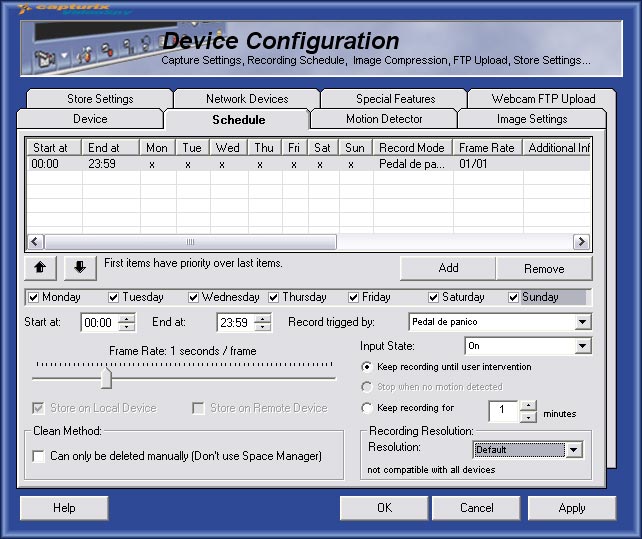
How to start recording
1. Press the ADD button to add a item on the schedule list, like the picture.
2. Select the item by clicking.
3. Select the week days that you want to record, then ajust the begin hour and end hour.
4. Select the trigger of the record operation, if you select Clock this will start on begin hour and ends on end hour, if you select Motion detector or other this will only start after a detector signal.
5. Adjust the recording frame rate, normally time lapse recorders use 1 FPS.
6. Select Store on Local Device.
You can add more items, the limit to schedule items is 99999 items.
How to remove schedule items
1. Select the item by clicking.
1. Press on Remove button
Record trigger
This option menu is dynamic it means that can be different in other machines with special hardware.
The common options are:
Clock - This will activate the recording operation at a specific hour.
Motion Detector - This will activate the recording operation when motion is detected (on a time interval).
Sound Detector - This will activate the recording operation when sound level reaches the limit defined (on a time interval).
Other options are the list of the digital Inputs available.
Frame Rate
The frame rate must be adjusted, but there are some facts that you must think: Disk space available (bigger frame rate will require more space and more system performance).
For Internet Edition range is : 10 FPS to 1 Image per 99 seconds
For Enterprise Edition range is : 30 FPS to 1 Image per 99 seconds
Motion Detection Parameters
Keep Recording until user intervention - When motion is detected this will keep recording until user stops manually the recording operation.
Stop when no motion detected - This will only record frames when motion is detected.
Digital Inputs / Motion Detection / Sound Detector Parameters
Keep recording for x minutes - When motion is detected this will keep recording more x minutes (x can be 1 to 60 minutes)
Digital Inputs Parameters
Input State - Here you can select the state of the input that triggers the recording (On,Off or Any)
Store Parameter
Store on Local Device - This will record images on the local computer machine where Capturix VideoSpy is installed.
Store on Remote Device - This option is only for specially surveillance equipment (like Video Servers, Cameras) that can record and store internally.
Default is Store on Local Device
Clean Method (only for Enterprise Edition)
If you set to turn off the space manager you can only delete this images manually this is good to protect the alarm event from being deleted.
Recording Resolution
On this option you can set different resolutions for each trigger or hour schedule, you can set a higher resolution for motion trigger or any detector.
For example:
24h/day - Recording at 160x120
Any event - Recording at 640x480
This will make a very high economy to the space available.
© Capturix Software Technologies. All rights reserved.